I just found the Long Thread's Top Tutorials of 2009. They've included links to many great projects and quite a few that I hadn't seen before. I've included both the Top Tutorials for 2008 and 2009 over in my 'Projects To Try' section.
Despite my frantic crafting before Christmas, I still have a long To Do List. For January, I'd like to :
- Make a dress for Josie's birthday
- Make shopping totes for my SILs or try this pattern
- Make covered planners for my SILs
- Piece together the girls' quilt top
- Make new pillow covers for the living room
I have patterns/plans for all of these projects except the pillows. I'd like them to have a modern-country feel. Maybe I'll try some simple appliques... If you have any ideas to share for pillow designs, I'd love to see them!

Showing posts with label tutorial. Show all posts
Showing posts with label tutorial. Show all posts
Tuesday, January 5, 2010


Thursday, December 17, 2009
Christmas Totes and Bags
It's no surprise that many of my gifts will be given in tote bags this year. I posted last week the tutorials I used - Irene's Classic Tote and Moda Boutique Shopper . Sew, Mama, Sew is hosting a Fiskars giveaway and bag sew-off, so here is a picture of the totes I made. The kids gave their teachers the Boutique Shoppers before I took a picture, but I can say they were fabulous!

This week I finished up some pencil bags and Boxy Zippered Pouches. I adore the boxy pouches and will definitely make more in the future! I made the black ones slightly bigger than the tutorial; my fabric pieces were 12" x 8" and I cut off 1 1/2" for the gussets. I also recommend interfacing if using lightweight fabrics. Feel free to browse my 'Projects to Try' sidebar for more easy gift ideas and feel free to leave me more project suggestions and links in the comments. I love a good tutorial!

We'll be leaving for our Christmas vacation tonight and won't be back until Christmas Eve. Wishing you all a Merry Christmas and blessed New Year!

This week I finished up some pencil bags and Boxy Zippered Pouches. I adore the boxy pouches and will definitely make more in the future! I made the black ones slightly bigger than the tutorial; my fabric pieces were 12" x 8" and I cut off 1 1/2" for the gussets. I also recommend interfacing if using lightweight fabrics. Feel free to browse my 'Projects to Try' sidebar for more easy gift ideas and feel free to leave me more project suggestions and links in the comments. I love a good tutorial!

We'll be leaving for our Christmas vacation tonight and won't be back until Christmas Eve. Wishing you all a Merry Christmas and blessed New Year!
Monday, December 14, 2009
Christmas in the Sticks

We got a big kick out of the Truckers' Light Parade on Saturday night. You know you live in the sticks when the log trucks, tow trucks & pick-up trucks get decorated with hundreds (thousands?) of lights and shut down the highway for a parade :) We met some friends from church at THE grocery store parking lot to watch the parade. It had warmed up a little - 20's- and stayed dry for the parade. It was really fun and neat to see the trucks lit up. We saw lots of Santas and a few nativity scenes on the trucks. We are loving life in a small town!


Other highlights of the weekend were getting to know Drew's buddy, Luke. Luke spent most of Saturday with us, then his family came over for dinner Sat. night after the parade. They are a great family and we hope to get to know them better. Sunday I got my craft on and made 5 more totes and all of our Christmas goodies. I finished the teacher's gifts of Boutique Shopper Bags and they are darling! I plan to make a few more for myself :)
The kids and Andy decorated Christmas tins while I cooked up some toffee and dipped pretzels & mint Oreos. Yum! The kids added wrapping paper designs and customized the tins with the families last names while Andy Mod-podged them on. Pretty cute and very handmade! We'll be delivering them to Andy's coaching friends at their awards dinner tonight. Andy also made gift bags for all (52) of his students. Pretty cool that he has so few students that he can give them each a gift. He has a few troubled ones that I'm going to make rolls for as a special gift later this week. I wish I could add a few extra hours in my days this time of year! I still have gifts to finish before we leave town on Thursday. Wish me luck!
Wednesday, December 9, 2009
Tutus Galore!

If you are still looking for a gift for the girl in your life, why not make a tutu? They are quick, easy, cheap and adorable...what more can you ask for?!! I have made 5 now for gift-giving and have a few helpful hints. Here is a good tutorial with the how-to. Bobbie also just posted a tutorial with the same method - easy! I buy my tulle by the yard (like Bobbi demonstrates) because it's cheaper - .99 cents/yd at fabric.com. I've also found the 6" x 25 yd spools on ebay for around $1 plus shipping if you don't want the hassle of cutting your own 6" strips. If making a girl's tutu, I use 3 yards or 2 spools for each tutu. I've found if you roll the 6" strip or fold it in quarters before tying it to the elastic you will have nice little pointy, curly separations in your tutu (see the blue tutu). I you just scrunch them up as you tie them on it turns out more wild-looking (see red/green/gold). However it turns out, you're girlie is sure to adore them!


Another easy accessory to add is a matching hair clippie. I bought some snap-clips and set aside 2 pieces of tulle for each barrette. Tie them onto the inside corner of the barrette and make a big bow. Trim the tails of your bow and you now have a matching set of clippies in no time!


Tuesday, December 1, 2009
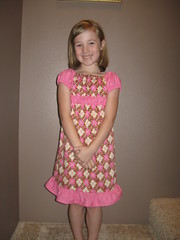
Birthday Outfit DONE!

I feel like I've procrastinated on Abby's birthday outfit this year. I've been busy making Christmas gifts, but finally got around to making Abby's 7th birthday outfit and it turned out amazingly well! I had ordered a 2-pack of long-sleeved Tshirts with the plan of embroidering one for her outfit. The cupcake design I found online (can't remember where- I found lots!) and the skirt was based off the Sydney skirt tutorial. I wanted a patchwork skirt like this one but didn't want to pay for a pattern, so I made the Syndney top layer out of stipwork pieces. It is fabulously full and twirly. I think Abby will be thrilled! Next I plan to buy some cardstock and make matching cupcake invitations. I think I'll try to cut the cupcakes of fabric and iron them on. We'll see how that goes - I'm a novice with paper!


I have enough fabric left to make one more. Who will get one next? I may offer it as a custom order in the shops. I'm still waiting for my first sale. Interested to see what will go first.
Monday, November 23, 2009
Free Pillowcase Tutorial

Thursday, November 12, 2009
Crochet: Easy Beanie Hat Pattern
I had a request for my basic hat pattern, so here it is:
Angie’s Easy Basic Beanie Hat
Hook: size G, H or I for kids; J or K for adults. Very large hook for double strand. The smaller the hook, the smaller the finished hat will be.
Yarn: Soft-style yarn is the most comfy. Light & Lofty is wonderful for girls and women's hats. Acrylic can be itchy, but is cheap. Figure to use ½ ball for single strand or 1 ball total if using double strand.
HAT Pattern: I like to work in circles. Set your marker after round 2, then just keep stitching around. This is written using a half-double crochet stitch (hdc). For a tighter weave, use a single crochet stitch or for larger weave, use a double crochet stitch. For a really quick, thick hat, use 2 strands of yarn with a big hook ( my favorite!).
To start: Chain 6 and close into a ring with 1 slip stitch in first chain.
Rnd 1: Chain 1, work 6 hdc in ring, join with slip stitch to beginning chain.
Rnd 2: 2 hdc in each stitch around -12 stitches. Put in safety pin in last stitch as a marker.
Rnd 3: 1 hdc in next stitch, 2 hdc in next stitch; repeat to marker - 18 stitches.
Rnd 4: 1 hdc in each of next 2 stitches, 2 hdc in next stitch; repeat to marker - 24 stitches.
(For infants, no further increases; just hdc in each stitch around until hat is your desired length.)
Rnd 5: 1 hdc in each of next 3 stitches, 2 hdc in next stitch; repeat to marker - 30 stitches.
Rnd 6:
For kids, no further increases; just hdc in each stitch around until hat is your desired length.
-1 hdc in each of next 4 stitches, 2 hdc in next stitch; repeat to marker - 36 stitches.
Rnd 7-10 (or longer)
Work one hdc in each stitch until desired length (6-8 inches from center of crown.)
Final 2 Rnds: Switch to single crochet (if you have used double or half-double) and stitch one sc in each stitch around. Fasten off; weave in ends.
Embellish by switching yarn colors to make stripes. For girls, use Fun Fur for the bottom two rows of single crochet or add a crochet flower, yo-yo, or buttons to your finished hat.

I'd love to see pictures of your finished hats. Enjoy!
Angie’s Easy Basic Beanie Hat
Hook: size G, H or I for kids; J or K for adults. Very large hook for double strand. The smaller the hook, the smaller the finished hat will be.
Yarn: Soft-style yarn is the most comfy. Light & Lofty is wonderful for girls and women's hats. Acrylic can be itchy, but is cheap. Figure to use ½ ball for single strand or 1 ball total if using double strand.
HAT Pattern: I like to work in circles. Set your marker after round 2, then just keep stitching around. This is written using a half-double crochet stitch (hdc). For a tighter weave, use a single crochet stitch or for larger weave, use a double crochet stitch. For a really quick, thick hat, use 2 strands of yarn with a big hook ( my favorite!).
To start: Chain 6 and close into a ring with 1 slip stitch in first chain.
Rnd 1: Chain 1, work 6 hdc in ring, join with slip stitch to beginning chain.
Rnd 2: 2 hdc in each stitch around -12 stitches. Put in safety pin in last stitch as a marker.
Rnd 3: 1 hdc in next stitch, 2 hdc in next stitch; repeat to marker - 18 stitches.
Rnd 4: 1 hdc in each of next 2 stitches, 2 hdc in next stitch; repeat to marker - 24 stitches.
(For infants, no further increases; just hdc in each stitch around until hat is your desired length.)
Rnd 5: 1 hdc in each of next 3 stitches, 2 hdc in next stitch; repeat to marker - 30 stitches.
Rnd 6:
For kids, no further increases; just hdc in each stitch around until hat is your desired length.
-1 hdc in each of next 4 stitches, 2 hdc in next stitch; repeat to marker - 36 stitches.
Rnd 7-10 (or longer)
Work one hdc in each stitch until desired length (6-8 inches from center of crown.)
Final 2 Rnds: Switch to single crochet (if you have used double or half-double) and stitch one sc in each stitch around. Fasten off; weave in ends.
Embellish by switching yarn colors to make stripes. For girls, use Fun Fur for the bottom two rows of single crochet or add a crochet flower, yo-yo, or buttons to your finished hat.

Tuesday, October 6, 2009
Tutorial: Too Big T-shirt to Ladies Fit Shirt
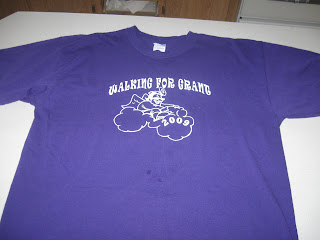
If you're like me, you have some t-shirts from special events or places that are just too big in the wrong places. I decided to re-fit a T from this years cancer walk and love the results!
I used my serger for the whole project. It took less than an hour from start to finish! If you don't have a serger, you can use your sewing machine instead. For knits, a ball-point needle and polyester thread is best (I just use all-purpose thread, though). I would recommend a medium length zig-zag or decorative stitch, since it will have some give with the knit fabric. Knits won't unravel, so you have the freedom to use whichever stitch you like best. For a great little girls T-shirt refashion, visit this tutorial from Make It and Love It. It gave me the inspiration to try this one.
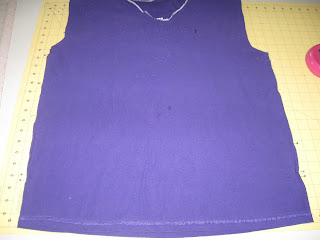
Here's the beginning and finished pictures:




Sew around your arm sleeves and voila - you're done!
Another way to do the sleeves is to fit them before sewing your side seams. The tutorial from Make It & Love It above does it this way.
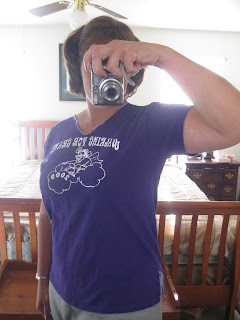
I'd love to see pictures of your finished re-fitted T's! Hope this was helpful and please ask if you have questions. This is my first tutorial I'm happy to help if a step is unclear. Happy sewing!
I used my serger for the whole project. It took less than an hour from start to finish! If you don't have a serger, you can use your sewing machine instead. For knits, a ball-point needle and polyester thread is best (I just use all-purpose thread, though). I would recommend a medium length zig-zag or decorative stitch, since it will have some give with the knit fabric. Knits won't unravel, so you have the freedom to use whichever stitch you like best. For a great little girls T-shirt refashion, visit this tutorial from Make It and Love It. It gave me the inspiration to try this one.
Here's the beginning and finished pictures:


Let's get started! First you need to de-construct your t-shirt. Start by cutting off the sleeves along the old seam. Next, trim down your side seams. I cut 1 1/2" off each side and 1" off the shoulder seam. From the sleeve, I cut 1" off the bottom and 1 1/2" off the old armhole seam. If you want a v-neck or larger neckline, cut this off the front panel of your shirt now. This is what your deconstructed T looks like after trimming:


You now have a front and back panel and two sleeves. Make sure your new sleeve will fit into your new armhole. I made mine smaller, so I had to move the armhole cutout up on the new front & back panels to fit the smaller sleeve. A little confusing if you're a new sewer, but just try it until it fits :)
Now we start re-constructing! Place your front and back panels with right sides together, matching up along shoulder seams. Sew across your shoulder seam. (I don't have a picture for this step)
Now is the time to finish your neck seam. I just serged around the opening. If you want a neck binding, the tutorial above has great step-by-step instructions for adding a binding using your extra fabric strips.
(My picture shows an open shoulder seam- yours should be sewn together now)

Next up is your side seam. Match up your front and back panels right sides together . I wanted a side flap at the bottom, so I measured up 3" and marked with pins. Finish these edges before sewing down the side seam. Pin and sew down your side seam.


Almost done! Next is time to add on your sleeves. This is the hardest part, but you can do it!
Start by sewing the underarm seam. Match your sleeves to their armholes - pieces should all be wrong-side out. Now, take a sleeve and turn it right-side out. Slide it into its armhole and pin around the opening. The right side of the sleeve and body are now together.


Another way to do the sleeves is to fit them before sewing your side seams. The tutorial from Make It & Love It above does it this way.

I'd love to see pictures of your finished re-fitted T's! Hope this was helpful and please ask if you have questions. This is my first tutorial I'm happy to help if a step is unclear. Happy sewing!
Subscribe to:
Posts (Atom)